Blue Knifty Knitter loom
Red Heart yarn
Knitting tool
yarn needle
(Click on the pictures for better detail)
1) I used the "flat bottom" method that Crystal explains here - with a slight variation. I found that when I got to step 2, It was hard to find the loops, and also hard to pull them all across. So I took a tip from the cupcake hat pattern by Sarah, using scrap yarn to mark my loops.
I e-wrapped 10 pegs once. Then I took pieces of contrasting yarn, putting one through each loop. I tried it 2 ways - with the rainbow I put the scrap yarn through the loop on the outside of the loom, and on the inside of the loom for the camo. I will tell you why I did this later on.
Then I knit back & forth for 9 rows. Now you are going to do step two of Crystal's flat-bottom directions - "stretch the stitches across the loom and attach them to the opposite side of the loom." This is where the scrap yarn-through-the-loops becomes real handy. The yarn not only marks the loops you need to pull over, but you can use it to help pull the loops over.
You will have 4 pegs empty - 2 on each side. Now you are ready for Crystal's step 3 - "pick up stitches from the side panels of the knitted piece and put them on the pegs." Now you have the bottom of your water bottle holder.
When I did the rainbow one, it left a small ridge on the bottom. So, when I did the camo one, I put the scrap yarn on the inside (see above). It got rid of the ridge, but it was much harder to pull the loops over. Not worth it since the ridge is so small. 
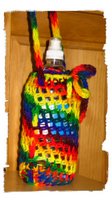
2) Then I e-wrapped & knitted off for 2 rows. I wanted a mesh look so I next did the Mock-Crochet (MC) stitch found here. The method here describes a flat panel, which I did not want, so I kept going around the loom, and did NOT do the step titled "Last 3 pegs on your loom." I think I did about 10 rows of MC, but the number you do will depend on the size of bottles you want this to hold (mine is big enough to hold up to a liter bottle.) I did end up with a larger hole where it goes from the e-wraps to the MC. I think next time I will skip MC steps 1 & 2, and go straight to MC step 3. 
3) Once your holder is as tall as you want (I kept a water bottle handy to try it on), do 2 rows of e-wrap. When I was done with the MC, here is where I did the MC step titled "Last 3 pegs on your loom," before starting the e-wrap. Again, I had a larger hole; I think next time I will skip that step - when reaching the end of the last row of MC, the last 3 pegs should be wrapped in the MC method. Knit over those 3, then go straight to the first peg with the e-wrap. To remove the holder from the loom, I did the Flat Removal Method found here.
4) To make the handle, I e-wrapped 4 pegs like a flat panel, going back & forth until I had the length I wanted. I took the handle off the loom with the Flat Removal method. I then "wove" the handle down the side of the holder, across the bottom, & up the other side, knotting the ends together (this is easier if the bottle is in the holder).
5) To make the drawstring for the rainbow holder, I e-wrapped & knitted off on 2 pegs to the desired length. I wanted to try something different for the camo holder, & wrapped and knitted off of just one peg - this resulted in a thinner drawstring. Then I "wove" this around the top of the holder.
No need for thanks - just send CHOCOLATE!!!


3 comments:
LOVE the camo bottle holder -and- using the mock crochet pattern for the mesh look.
I just used the mock crochet pattern to knit hats for the chemo patients at my office for summer.
Thanks for the ideas - may have to make one for my dear Dad for those warm mowing days ahead
That is great tip for how to keep track of the stitches when pulling them over to the other side of the loom for the 'flat bottom method'
Great job explaining!
If you don't mind, I'd like to add a link to your blog from my pattern!
Of course Crystal! I feel honored :o)
Post a Comment